Ironside Tech Tip: Dynamically Selecting Filters Utilizing Before or After Aggregation via a Prompt

Synopsis:
Enable a user via a prompt to pre-select if a value will be filtered before or after aggregation.
Overview:
Normally, the report author hard codes filters placed on facts in the Properties pane as before or after aggregation. While this is adequate in most report scenarios, hard coding can be limiting if the executing end-user would like to dynamically choose which aggregation method to use on the fact value at run time. When creating typical reports, this option is not obvious or apparently possible.
This article will discuss how to give users aggregation options using a special coding technique in the Query Explorer in conjunction with a Parameter passed to a data item(s) from a prompt.
In brief, two data items containing if logic will resolve to a valid filter expression. Both of these data items are then dropped into the Detail Filters pane. Each of the two data item expressions in the Filters pane evaluates the parameter from a prompt and, depending on the user’s selection, will activate one of the two data items to return an expression that is a syntactically correct filter. The other data item returns an inert (non-executing) pseudo filter. Each of these filters will then have their properties set to before or after aggregation as appropriate. When the report is run and the user chooses an aggregation method via a prompt, the data item/filter that matches the user’s selection will activate the selected filter made from the prompt. The other data item, based on reverse logic in the statement/filter, is essentially ignored.
More details about this technique are described in depth in the NOTES section B) at the end of this article.
Steps:
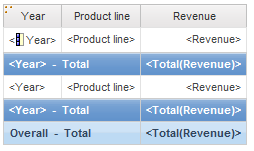
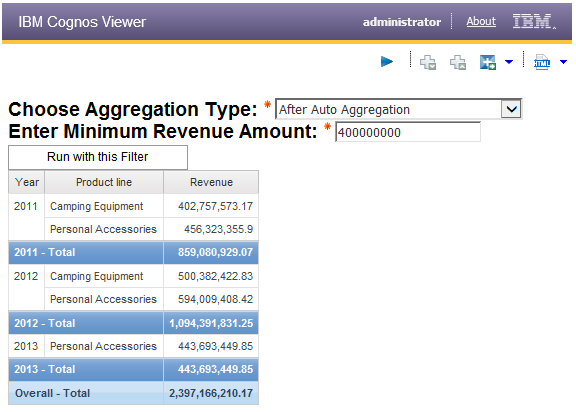
1) Create a report (e.g. List report with Year, Product line, Revenue)
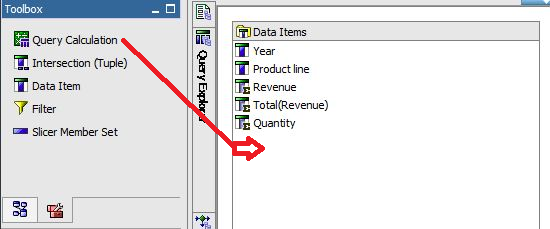
2) Using the Query Explorer, go to Query 1
3) Add Quantity or a similar fact to the query. (This value will be used as a non-effective placeholder in an ifstatement that will be created in Steps 5 and 7. See the NOTES section at the end of this document for additional details.)
4) From the Toolbox, drag and drop a Query Calculation into the Data Items pane:
5) a) In the Name field, enter: BAA (meaning Before Auto Aggregation).
b) In the Expression Editor, enter the following code:
Note: The value B will be read in from a hard coded value prompt created in steps 18-21.
if ( ?Aggregation Choice? = ‘B’ )
then
( IS NOT NULL )
else
( > ?Revenue? )
6) From the Toolbox, drag and drop another Query Calculation into the Data Items pane
7) a) In the Name field, enter: AAA (meaning After Auto Aggregation).
b) In the Expression Editor, enter the following code:
Note: The value A will be read in from a hard coded value prompt created in steps 18-21.
if ( ?Aggregation Choice? = ‘A’ )
then
( IS NOT NULL )
else
( > ?Revenue? )
8) Drag and drop the BAA query calculation into the Filters pane
9) Click the Validate icon in the window that pops up and click OK.
10) In the Properties pane in the General area, ensure that the filter is set to Before Aggregation.
11) Drag and drop the AAA query calculation into the Filters pane
12) Validate the filter and click OK.
13) In the Properties pane in the General area, ensure that the filter is set to After Aggregation.
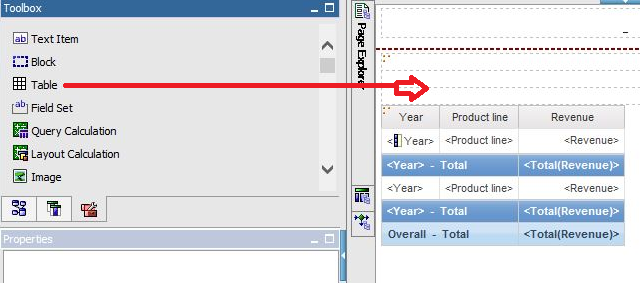
14) From the Toolbox, drag and drop a Table object above the report container that is 1 column by 3 rows.
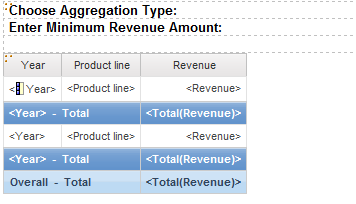
15) Drag and drop Text Item objects into each row and annotate them as shown below:
16) From the Toolbox, drag and drop a Prompt Button object into the last row:
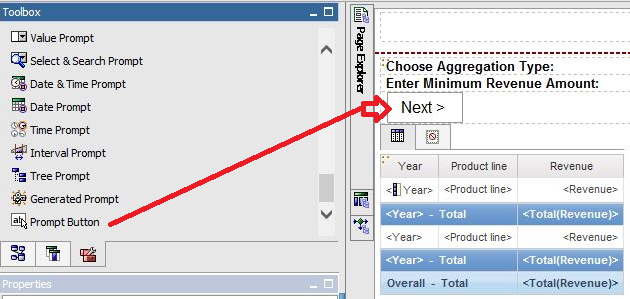
17) From the Toolbox, drag and drop a Text Item object onto the Next prompt button to customize it and type: Run with this Filter.
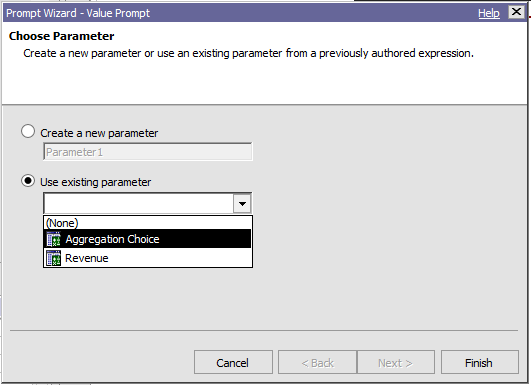
18) From the Toolbox, drag and drop a Value Prompt object to the right of the Choose Aggregation Type text item.
19) Set up the value prompt:
a) Select the Value Prompt
b) Select the Use existing parameter radio button.
c) Select the Aggregation Choice parameter.
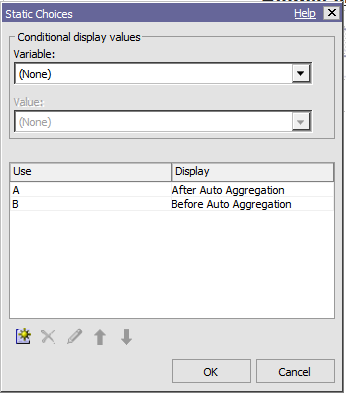
20) Set up static choices for the value prompt:
- Select the top Value Prompt
- Go to and double click on Properties > Data > Static Choices.
21) Add use and display values:
- Click the Add icon (sunburst).
- Enter the following use and display values:
Use Display
A After Auto Aggregation
B Before Auto Aggregation
22) Set default selections for the value prompt:
a. Go to Properties > General > Default Selections
b. Click the New icon (sunburst) and enter B.
c) Click OK.

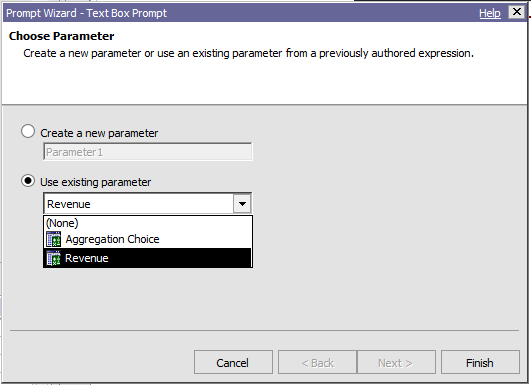
23) From the Toolbox, drag and drop a Text Box Prompt object to the right of the Enter Minimum Revenue Amount text item.
24) Select the Text Box Prompt object, select the Use existing parameter radio button, and select Revenue:
25) Enter a default selection for the text box prompt:
a. Go to Properties > General > Default Selections.
b. Click the New icon (sunburst) and enter 1 (one).
c. Click OK.
26) Save the report and run it:
NOTES:
A) The Quantity fact is required in the BAA and AAA filters. The logic is that any Revenue amount must include at least a Quantity greater than one (1). This value will be evaluated as a filter that should always return all data as long as some Revenue amount is specified. When developing your application, you must include some other value like Quantity that can be evaluated and is a valid filter that could apply against your query (see next).
B) The if statements in Steps 5 and 7 use a reverse logic on purpose. Based on the selection made from the value prompt, only one of the filters will act as a filter. However, the laststatement must be valid and cannot be a duplicate of the other filter. Therefore, the first then clause will be executed and evaluated as a valid filter in one of the filters, and the other filter by default will execute the else clause on Quantity, which will always be valid. This is in essence a valid but non-effective “inert” filter that is there so that the report will validate and not error at run time.
C) Remember that while filters are normally directly created in the Filters pane in the Query Explorer, this example shows that logic expressions like steps 5 and 7 or standard filter syntax can be created as a data item and then dropped into the Filters pane.
D) The report of course can be beautified by changing the value prompt to radio buttons, centering the prompts and report, turning off adornments, etc.